


Euphyllia-Eating Flatworms
EEFW • coral-associated flatworms • no confirmed species name
A practical guide to finding worms around the flesh band, removing adults and eggs, and protecting torches, hammers and frogspawn through careful follow-up.
Written by Christian, Signature FragsLast reviewed:
Found a worm? Start here
- Stop moving or selling exposed corals. Photograph what you find and inspect every Euphyllia-type coral in the same system.
- Move affected corals into a separate, stable quarantine system if possible. Shared water and tools can undermine isolation.
- Use a suitable coral dip to detach mobile worms, following its current label. Inspect and physically remove accessible eggs from bare skeleton.
- Keep the corals accessible. Record each inspection, dip, worm count and egg removal; arrange repeat checks instead of relying on one clean dip.
One dip is a first step, not proof of clearance. The coral needs good husbandry throughout treatment: repeated handling and unsuitable quarantine conditions can cause further losses.
What are Euphyllia-eating flatworms?
EEFW is a hobby name for flatworms associated with tissue damage on Euphyllia-type corals. Hobbyists commonly describe these as polyclads, but this label does not establish a single scientifically identified species. Torch corals are prominent in published reports; keepers also report worms on hammers and frogspawn, many of which are now classified as Fimbriaphyllia. Treat all exposed Euphyllia-type corals as worth inspecting.
Not every flatworm seen on a coral is an EEFW. Small surface-dwelling acoels, including Waminoa, and other hitchhikers can look different and have different feeding habits. The Acropora-eating flatworm is a separate pest. Its known development times, fallow periods and treatment research cannot simply be transferred to EEFW.
Identify the worm and inspect the flesh band
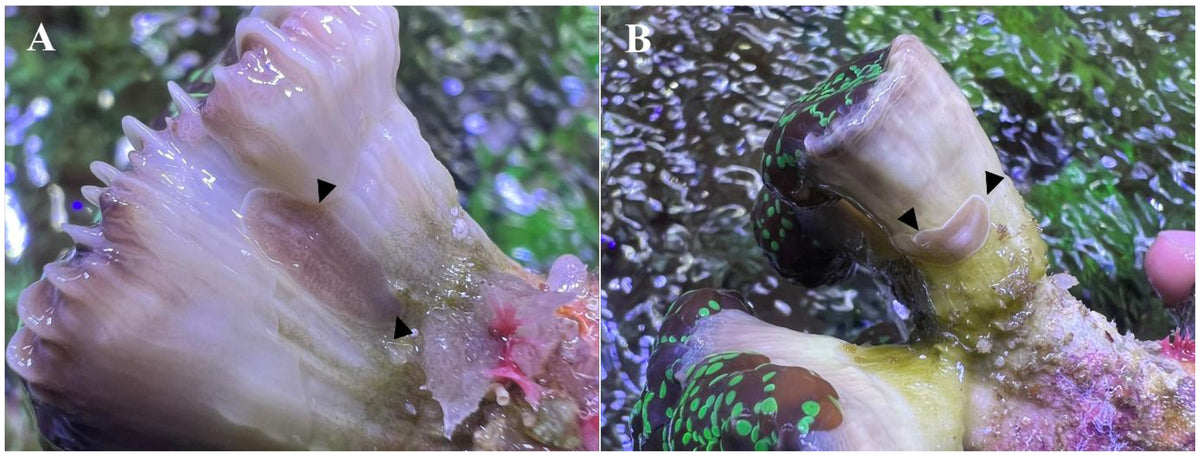
- Look for a flattened, soft body that glides over the skeleton or folds when dislodged. Colour and shape vary: pale, translucent, brown or grey forms are reported.
- Inspect underneath the expanded head and along the lower edge of the flesh band—the living tissue that extends down over the skeleton. Rotate the coral gently under white light without touching or stretching its flesh.
- Use a magnifying glass or macro photograph. In blue lighting a worm can blend into the coral, mucus or algae.
- Check retracted heads after lights out as well as during the day. A pale patch that moves deserves closer inspection; a still photograph alone may not resolve the identification.
Jake Adams reported a particularly damaging torch-associated form approximately 6–10 mm long in 2020. That observation is not a size rule for every EEFW; juveniles or other forms may be smaller.
For an off-coral comparison, the 2019 Reef2Reef infestation report includes photographs of worms collected after dipping. See the original photo link below; identification in that thread is a hobbyist assessment.
Open the original off-coral worm photograph — i_declare_bankruptcy, Reef2Reef (2019)
Eggs: the part a dip can miss

Hobbyist photographs show closely grouped small capsules or dots adhering to exposed skeleton around and beneath the head. Their colour and visibility change with lighting, algae and the surface beneath them. Inspect all sides, crevices, branch junctions, plugs and glued areas; a single visible patch may not be the only one.
Do not assume an adult-removal dip also kills eggs. Physically remove accessible masses from bare skeleton in a separate vessel with a small brush or suitable pick, then inspect again under magnification. Keep tools away from living tissue. Never scrub, scrape or cut the flesh band to reach an egg mass.
Replacing an egg-bearing plug or removing a small piece of dead skeleton can help only when it can be done safely away from the head. An LPS coral cannot be stripped back like an Acropora frag. If eggs sit beside living tissue or deep in an inaccessible area, maintain isolation and seek experienced help rather than damaging the coral.
Old capsule shells can remain attached. Their presence alone does not prove that the contents are viable; colour alone does not reliably prove that eggs are dead either.
Signs of damage—and important lookalikes
- Persistent retraction, reduced extension, or a head that is less inflated than its neighbours.
- Recession of the lower flesh band, newly exposed skeleton or irregular tissue loss around the base of the head.
- Worms or suspected egg masses in the same location as the damaged tissue. This combination is more useful than poor extension by itself.
These signs are not diagnostic on their own. Shipping damage, excessive flow, stinging neighbours, unstable salinity or alkalinity and other disease can produce similar symptoms. Check temperature, salinity, alkalinity, calcium, magnesium and nutrients alongside the pest inspection. Rapid tissue breakdown or brown jelly needs prompt assessment as a separate disease concern; removing worms may not resolve it.
Confirm the problem and contain exposure
- Prepare a white or clear inspection vessel with matched aquarium seawater. Hold the coral by sound skeleton, not its tissue.
- Inspect the underside and gently direct water around the bare skeleton with a pipette or baster. Avoid strong jets into the fleshy head.
- If needed, perform a labelled coral dip and examine the bottom of the vessel. Collect a dislodged worm for a close photograph rather than guessing from a distant tank image.
- Note exactly where adults and eggs were found. Inspect every exposed Euphyllia-type coral, including apparently healthy heads.
- Keep quarantine tools separate. Rinse and clean equipment before reuse, discard treatment water and prevent splashes or carry-over into clean systems.
A negative inspection or dip reduces suspicion but does not exclude hidden adults or eggs. Ask an experienced coral keeper or supplier to review sharp photographs of the worm and the coral if the identification remains unclear.
Choose a treatment you can repeat safely
The strongest recurring hobbyist approach is a combination of isolation, removal of mobile worms, physical egg removal and repeated inspection. There is no well-established EEFW-specific treatment that guarantees every life stage is eliminated without risk to the coral.
Coral Rx and Revive both appear in first-person reports of worms releasing or being removed during dips. These are observations from individual tanks, not comparative trials. Choose a coral dip whose current instructions support your coral type and use its exact formulation, concentration and duration. Products with similar names may have different dose instructions.
Potassium chloride (KCl) also appears in hobbyist accounts, and the 2026 review illustrates its use with Euphyllia. That illustration does not establish a universally safe EEFW dose, duration, repeat interval or egg-killing effect. This guide therefore does not turn an improvised spoon measure into a standard recipe.
Freshwater dips, peroxide and garden insecticides also appear online. They are not the routine recommendation here: stressed LPS tissue can be injured, formulations differ and the EEFW-specific safety evidence is weak. Do not mix dip products, increase strength because worms remain attached, or combine several aggressive treatments in one session.
Wrasses are reported to help in some tanks and to ignore the problem in others. Predation is supporting management, not proof of eradication or egg removal. Choose livestock for long-term compatibility and tank size. Likewise, do not assume a velvet flatworm-eating nudibranch will control these coral-associated worms simply because it eats other flatworms.
Reports about Flatworm Exit conflict and may concern different flatworms. Success against red planaria does not establish effectiveness against EEFW. Whole-tank chemical treatment is not a substitute for inspecting the coral and removing eggs.
A practical dip-and-inspection procedure
- Prepare first. Have a measured dip vessel, fresh saltwater rinse vessel, magnifier, gentle baster, brush and record sheet ready. Match temperature and salinity; keep the coral submerged while inspecting where practical.
- Follow the current label. Measure water volume and product accurately. Use the prescribed immersion time and any required circulation. Do not copy a dose for a different formulation.
- Detach mobile worms. Gently move water around the underside and skeleton during the permitted dip period. Observe what comes off; if worms remain, avoid escalating strength without appropriate product advice.
- Remove eggs from bare skeleton. Inspect separately under white light. Brush or lift accessible masses carefully while supporting the skeleton, staying clear of the living flesh band.
- Rinse in fresh matched saltwater. Transfer to the prepared quarantine system. Never return dip water to the tank or reuse a dirty dip for another treatment.
- Record the findings. Note adults, egg sites, product and actual duration, and photograph the same flesh-band area. Check the coral’s response before deciding on another treatment.
Coral Rx’s manufacturer instructions emphasise measured preparation, inspection, a fresh saltwater rinse and quarantine. Its adult-removal procedure is not evidence that EEFW eggs are killed.
Repeat checks: plan for weeks, not one dip
Inspect between treatments and remove visible eggs whenever it can be done safely. Schedule repeat adult-removal dips with the coral’s condition and the product guidance in mind. Daily chemical dipping is not automatically better; repeated handling or overdipping can worsen tissue recession.
Published hobbyist schedules vary. Jake Adams suggested weekly dips for roughly six to eight weeks after observing persistent eggs. A 2023 keeper described approximately three weeks of Revive treatments and egg removal, with a clean final inspection but loss of two small frags. A separate 2022 quarantine discussion describes a three-day repeat interval for two weeks. These reports demonstrate variation, not a validated life-cycle timetable.
A roughly weekly review is a useful planning checkpoint; it is not a proven hatch window or a universal dip prescription. If new adults or eggs appear, continue isolation and reassess hidden surfaces and treatment technique. Seek product or experienced coral-care advice before increasing frequency on a declining coral.
Keep a simple log: date, coral ID, adult count, egg sites removed, dip used, tissue condition and next inspection. Photograph the same side each time. A few apparently clean days are not a reason to make the coral inaccessible again.
Quarantine and corals fixed to rock
Quarantine must support the coral, not merely hold it. Use stable seawater, suitable light, gentle indirect flow and enough space to prevent stings. Keep heads accessible and monitor the flesh band. Temporary racks with excessive flow or very dim light can undermine recovery.
Where practical, include every exposed Euphyllia-type coral in the programme. Check plugs, supports and nearby removable surfaces. Do not share water with the display or transfer wet equipment between clean and exposed groups.
If a colony is fixed to rock, removal of the attached rock may be safer than pulling on its skeleton. Avoid snapping near the head. When isolation is impossible, accessible manual removal and inspection can reduce the burden, but hidden surfaces and continued exposure make clearance harder to demonstrate.
There is no established EEFW-specific host-free display period in the evidence reviewed here. Do not borrow a guaranteed fallow countdown from Acropora flatworms, or assume that removing only the visibly affected torch has cleared the display.
Recovery and deciding when to return a coral
- Look for repeated clean inspections of all previously affected surfaces, with no new adults or egg masses across multiple checks.
- Look for stable or improving tissue coverage and extension under appropriate conditions. Better extension alone does not prove the pest is gone.
- Continue observation for several weeks after the last finding as a practical precaution, adjusting the programme to the coral and new evidence. This is not a scientifically validated clearance period.
- Keep the coral removable when it first returns. Reinspect the underside and other exposed corals regularly. Any new finding restarts the investigation.
Some heads recover after the worms and eggs are removed; severely damaged heads may still be lost. Avoid rapid changes in light, flow or chemistry while assessing recovery. Do not add another chemical treatment simply because the coral has not inflated immediately.
Prevent the next introduction
- Inspect new torches, hammers and frogspawn from every supplier, including the entire lower skeleton and underside.
- Dip new arrivals according to the current label, inspect for eggs and quarantine before adding them to a coral collection.
- Replace or clean suspicious plugs where safe, but remember that eggs can sit on the coral skeleton itself.
- Keep new purchases separate from corals undergoing treatment, and avoid trading or selling exposed stock until the programme is complete.
- Build routine flesh-band photographs into coral checks. Early detection leaves more healthy tissue to protect.
Christian’s Take
Start at the underside, not just the tentacles. A torch can still look impressive while its lower flesh band is deteriorating. Inspect the skeleton properly, remove the worms and eggs you can reach safely, and keep the coral accessible while you follow it through.
The practical approach is patience and consistency: careful removal, sensible dips, stable conditions and a written record. A clean dip is encouraging. Repeated clean checks and a recovering flesh band give you a better basis for confidence.
Sources and evidence
Research reviewed 4 October 2026. This guide combines published photographs, first-person hobbyist accounts, manufacturer instructions and practical husbandry synthesis. Forum recommendations are not controlled trials. Species identity, hatch timing, safe repeat intervals and complete eradication remain uncertain.
Image credits
Adult and egg figures: Pedro Henrique Magalhães Cardoso, in Cardoso et al. (2026), Figures 1 and 6, licensed CC BY 4.0. Full figures reproduced without alteration. The egg figure contains two different host genera; only panel B represents Euphyllia eggs.
Creative Commons Attribution 4.0 licence
Torch underside photograph: Reef Builders, article by Jake Adams (2020). Source attribution is provided; reproduction permission has not been confirmed for a future public launch. Off-coral photograph: i_declare_bankruptcy, Reef2Reef (2019), linked to the original rather than reproduced.
Keep building your pest-check routine
Compare other coral pests and keep inspection, quarantine and careful follow-up part of every introduction.
Explore Pests & Problems